Page 5 of 9
Re: DIY build - garage studio
Posted: Thu Mar 13, 2014 8:33 am
by Marc G
GRIMESPACE wrote:Thanks! Yeah, can't wait to christen the place for real. Ya'll are invited!

Speaking of jammin', got to jammin' on some (tinted) primer - final paint should go on tomorrow night, if all goes well. That color will be a bit darker, but this gives a good idea of what the final product will look like.
Oh, also (jammin') related, I cranked my amp a bit tonight. My wife check the sound level outside, and we're still pretty much ok, but that room is a friggin reverb tank, fo' sho' (like you all have told me). Can't wait to get the traps and other stuff in there to soak up some sound.
very cool! I'm sure once you put up some foam on the walls the reverb will get under control..
Re: DIY build - garage studio
Posted: Thu Mar 13, 2014 9:42 am
by EndTime
Excuse me if this has been answered. Where did you buy the Rockwool? I know i can order it, but I've never found it in any box home improvement store..
Re: DIY build - garage studio
Posted: Thu Mar 13, 2014 11:40 am
by Tortuga
I found mine at my local Home Depot (Inland Empire area of Southern California) and I know they're still carrying it. I check every so often, 'cause I will be needing more. I've seen it at Lowe's, too.
If they don't carry it local to you, I'd look at the website and see if they'll ship to the store for pickup. Would probably be much cheaper than having it delivered to your house.
It's disappointing that the home stores aren't consistent across the country with what they carry, but I totally get it. We don't normally need the subfloor material for wet basements mentioned above by Sen Clay Davis, 'cause most houses in this part of the country don't have basements at all. So, if I were to buy that stuff, it'd cost me quite a bit in shipping (which I why I probably won't get to do it). Same goes with lumber - our local stores carry stuff for construction and plain materials, whereas the Depots back East supposedly have halfway decent flamed maple that the guys on MLP use for building Les Pauls.
By the way, the stuff I use is branded 'Roxul Safe n' Sound'.
Good luck!
Re: DIY build - garage studio
Posted: Thu Mar 13, 2014 11:47 am
by Tortuga
Marc G wrote:very cool! I'm sure once you put up some foam on the walls the reverb will get under control..
Thanks man - I'm really looking forward to that. Right now when I'm working, I can hear every little noise magnified. Whenever I drop a tool on the floor, it sounds like a gunshot, and I just about went insane when I was sanding

BlackWolf wrote:Nice color!
Yeah, I like it a lot. It was picked for the room I got moved out of (the one my son is in now) as a good, complimentary color to the cherry color of my SG. I'm anxious to see how it all ties together with the dark carpeting and black trim I'll be installing.
Re: DIY build - garage studio
Posted: Thu Mar 13, 2014 11:55 am
by BlackWolf
GRIMESPACE wrote:Marc G wrote:very cool! I'm sure once you put up some foam on the walls the reverb will get under control..
Thanks man - I'm really looking forward to that. Right now when I'm working, I can hear every little noise magnified. Whenever I drop a tool on the floor, it sounds like a gunshot, and I just about went insane when I was sanding
BlackWolf wrote:Nice color!
Yeah, I like it a lot. It was picked for the room I got moved out of (the one my son is in now) as a good, complimentary color to the cherry color of my SG. I'm anxious to see how it all ties together with the dark carpeting and black trim I'll be installing.
Cool!
I so look forward to see the finished job. It's cool and inspiring as well, as i plan to have my own jam-room when i buy my house somewhere in the future.
Re: DIY build - garage studio
Posted: Thu Mar 13, 2014 12:08 pm
by Devin
That Minecraft costume is epic

Re: DIY build - garage studio
Posted: Thu Mar 13, 2014 1:06 pm
by Tortuga
Devin wrote:That Minecraft costume is epic
Tell you what, the amount of stress that occurred when I had to apply those skins was NOT funny!

Re: DIY build - garage studio
Posted: Fri Mar 14, 2014 10:24 am
by Tortuga
Quick update - painted the room last night. Came out great with one coat, so I'm leaving it at that. Hoping to get the electrical outlets up and running between today and tomorrow, and then will likely be moving on to the muffler boxes, as I'm still sorting out what to do about the flooring. Might try getting the lid on the A/C niche while I'm at it.
Re: DIY build - garage studio
Posted: Fri Mar 14, 2014 12:39 pm
by GuitarBilly
dude this is seriously awesome. Next time I'm in the IE I will stop by and jam
Re: DIY build - garage studio
Posted: Fri Mar 14, 2014 4:36 pm
by Tortuga
GuitarBilly wrote:dude this is seriously awesome. Next time I'm in the IE I will stop by and jam
Oh hell yeah you will! Sounds like a great time. Give this thing a real run for it's money.
Re: DIY build - garage studio
Posted: Sat Mar 15, 2014 9:48 pm
by JCDenton6
Awesome man, looks killer!
Wish I was able to do this, gotta wait till I can buy a home

Re: DIY build - garage studio
Posted: Sun Mar 16, 2014 12:03 am
by Tortuga
JCDenton6 wrote:Awesome man, looks killer!
Wish I was able to do this, gotta wait till I can buy a home
Thanks man, and I hope it eventually works out for you. It only took me 22 years of home ownership to get to this point

Re: DIY build - garage studio
Posted: Sun Mar 16, 2014 12:19 am
by Tortuga
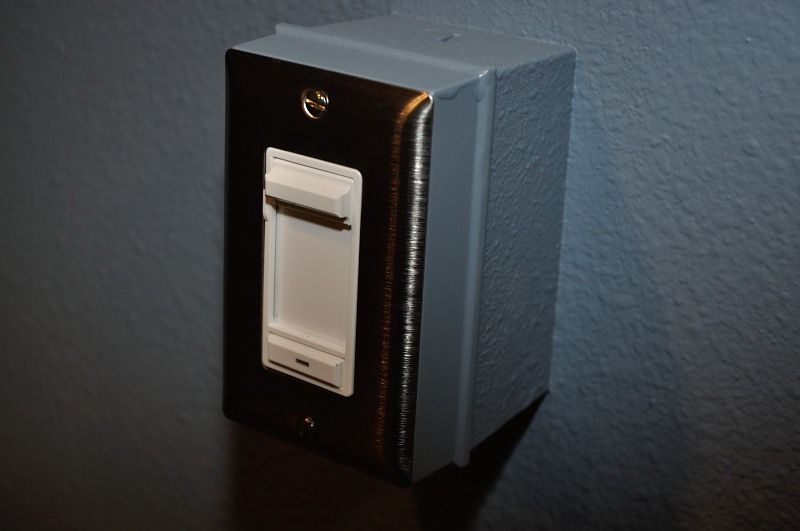
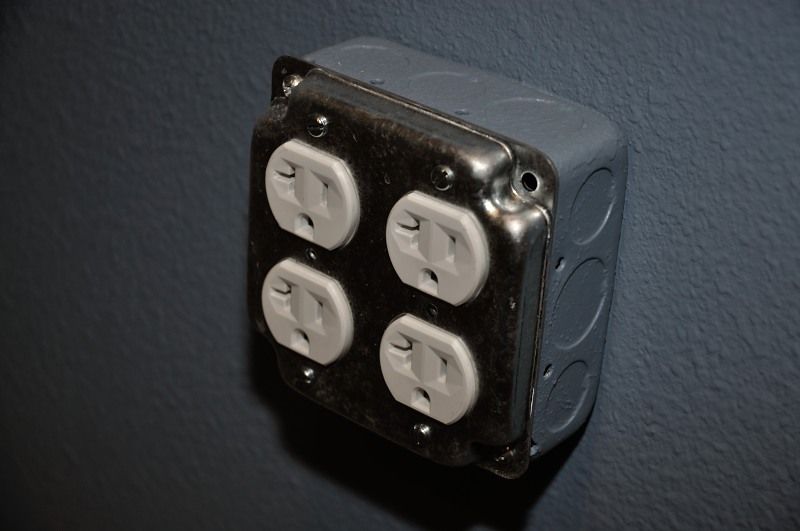
Have made a lot of progress this week. Lights done. Paint done. All electrical outlets and master cut-off switch done. Floors are now prepped for carpet. Carpet was ordered yesterday, and should be installed by next weekend (YEAH!!!

).
A few days back, I posted about the electrical system. Here's a couple shots of the finished product. Doesn't look too bad sticking out of the wall, and the paint really helps make it all blend in. Super happy to have this done. No more extension cords and rinky-dink lighting
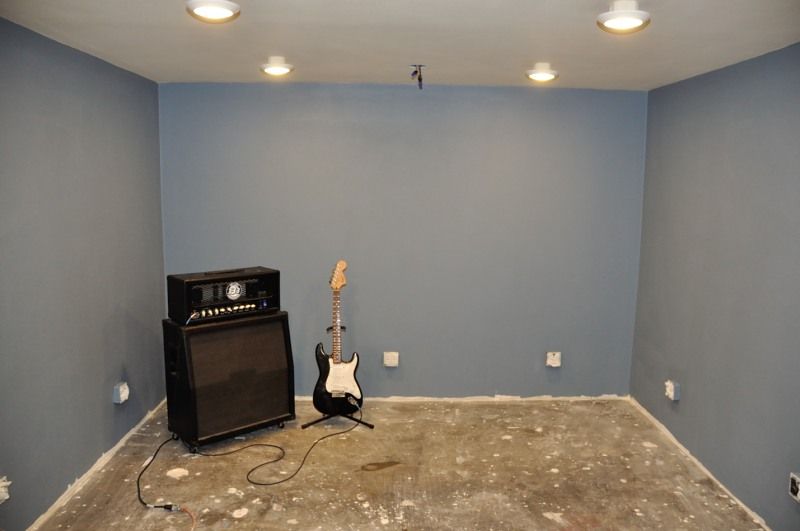
Got the floors as clean as I could so the room was semi-presentable for the pics I took for the 2014 BOTR treads. Loaded in the majority of my gear and am pretty happy that the room doesn't seem tiny with it all in there. Here's a look at the (other) family.
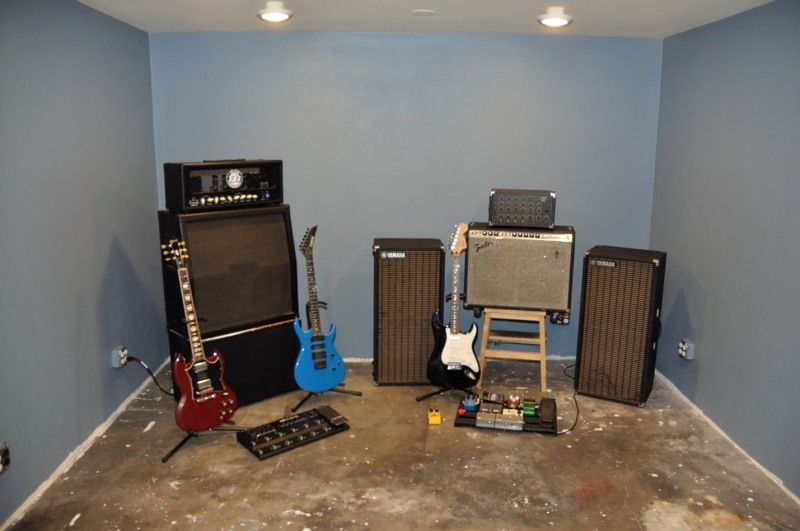
Next up is muffler boxes and getting some of the framework set up for the corner bass traps over the next week, and may even get some of it put in during / after the carpet install. I'm well on-target for having the room ready for it's first jam at the beginning of April, and I'm ecstatic!

Re: DIY build - garage studio
Posted: Sun Mar 16, 2014 8:25 am
by clipless bumper
where's the bass rig and the drums??
Re: DIY build - garage studio
Posted: Sun Mar 16, 2014 9:06 am
by Tortuga
Working on it, man. Gotta get the carpet in there before I can really start making myself at home.
Re: DIY build - garage studio
Posted: Sun Mar 16, 2014 9:13 am
by clipless bumper
cool - I've been meaning to measure and post pics of my music room.
It can't be much bigger than yours - and the drums really take up a lot of room.
I will be interested to see what you do about reflections/standing waves.
All I did was hang wall hangings/packing blankets on most of the walls.
I have an acoustical drop ceiling, though - so that probably helps some - as well as carpet/rugs on the floor.
My walls are also concrete block - so that may cut down some resonance also.
Monday morning quarterbacking, I know - but I wonder how much difference it would have made if you had built it with a slanted ceiling, and non-parallel walls. Would that have cut down on the reverb effect?
Re: DIY build - garage studio
Posted: Sun Mar 16, 2014 9:51 am
by Tortuga
I read some about non-parallel construction. My biggest problem with that is getting at least some headroom in there, since I was dealing with existing construction that limited how high I could go, without trying to incorporate it into my room - that's something I wanted to avoid, because tying to the outer garage shell means I'd be dealing with sound transmission / vibration issues that were counter to my objectives. I'm not trying to kid myself that this will be a perfect do-all room for every purpose - my first priority was to have a jam room where I could get friends and my kids together that was convenient, and wouldn't have my neighbors (or the cops) pounding on my door telling me to stop. This is about as convenient and sound-mitigated as I can make it at this point
Right now, the inside ceiling sits at 7-1/2 feet, and the lights are about 4 inches below that. I may consider putting some acoustic tiles onto the ceiling if I continue having problems after putting in carpet, bass traps, wall panels, and the angled ceiling and mid-ceiling panels I'll probably put in (similar to what Sen Clay Davis posted on the prior page). I'm just going to start with the common recommendations and move forward from there.
Lastly, I didn't go with angled walls, because of my wanting (needing

) to have at least some storage space in the garage. Again, I've pushed the limits as far as I could without taking over the entire garage or feeling like I was crawling into a small cave to jam in.
Interestingly, when I loaded a lot of my gear in last night, I felt like the edge may have been taken off some of that echo. May just be that I'm hoping it was better, but it could be that there's some diffusion at work there, that will only get better when I get more gear and a recording / work desk put in. Fingers crossed, eh?

Thanks for the thoughts!
Re: DIY build - garage studio
Posted: Sun Mar 16, 2014 9:53 am
by ajaxlepinski
Once you have your carpeting and acoustic tiles installed, you'll be fine.
Nonparallel walls, ceiling/floor eliminate the standing waves (back and forth echos between two parallel surfaces).
I had a nasty standing wave, from floor to ceiling, at about 15K hZ, before adding carpet and foam tiles...
When I clapped my hands, a fast echo bounced back and forth, between the cement floor to the sheet rock ceiling, making an almost buzzing sound.
Even without nonparallel walls, carpeting and acoustic tiles will eliminate standing waves and reduce reflections.
The idea behind pyramid or fin shaped acoustic tiles is to diffuse the sound reflections and reduce the energy of the wave.
The tiles themselves will absorb sound, both on the way into the tile and reflecting back though the tile after bouncing off the sheet rock.
Only very high frequency sounds will bounce directly off acoustic tiles and aren't noticeable.
Walls built with different thickness dry wall (5/8 on one side and 1/2 on the other ) help prevent sound from being transferred to the outside.
5/8 rock vibrates at one frequency and 1/2 vibrates at another frequency - the different thickness helps to prevent sympathetic resonating, reducing sound leakage.
The same idea us used when installing a double pane window between the control room and studio area at recording facilities - two different thicknesses of glass are used.
Here are some really nice, decorative wood acoustic panels but, cedar shingles work well


Re: DIY build - garage studio
Posted: Sun Mar 16, 2014 10:06 am
by Tortuga
Yup - that's probably a similar echo that was killing me when I was working in there. Drop a tool on the concrete floor, and it sounds like someone hit me over the head and shoved an ice pick in my ear. When I was playing my guitar doing a sound test (to see how much was escaping outside), it sounded like I was standing in the middle of some huge reverb tank, and totally changed how the amp sounded. I'm sure if I had some other musicians in there, we wouldn't be able to 'hear' anything but a rush of noise.
Really like the idea about diffusion panels. Looks really cool, too. I've got plenty of scrap wood of varying sizes and shapes. I wonder how hard that'd be to make?
Unfortunately, I didn't go with different thicknesses of drywall - I stuck with 5/8 on each side. I figured that with staggered studs and two layers / types of insulation, I was doing a lot to kill the sound waves, and if I was really having problems, I'd either check out audimute sheets or install another layer of 1/2" drywall on the inside - possibly even using channel strips to add an air layer. Again, the problem for me is balancing sound mitigation with available perimeter / ceiling size.
Love all the input - keep it coming!
Re: DIY build - garage studio
Posted: Sun Mar 16, 2014 10:16 am
by ajaxlepinski
Staggering the studs was a great idea!
Along with the interior wall insulation, you really eliminated the need for different thickness drywall.
If I can only get rid of all the junk in my garage....
Re: DIY build - garage studio
Posted: Sun Mar 16, 2014 4:05 pm
by Tortuga
Good to hear, and my tests thus far have confirmed that the system we're building is pretty effective at handling a fairly loud guitar, and will likely work well for my purposes. Haven't had bass and drums going so it's probably not enough to judge, but I'm also not done with all the mitigation I'm planning to do. Bass traps, acoustic panels, carpet / padding, and risers for the drums and amps are still on the agenda.
Now, keep in mind that I'm saying it's good for
my purposes - this being mainly rock / hard rock jams, maybe some old-school metal here and there, but not the full-rage 5-piece that would blow the roof off the joint. I'm sure I'll try it at some point (or maybe my kids will
, once they get their own bands together), but it won't be the norm.
I hear ya on the messy garage. You should have saw mine before I cleaned it out - spent 3 weekends just getting it to the point where I started posting photos of the construction, and that was still a mess. Stuff was packed into my shop, my patio, and parts of my house for weeks. But the sense of relief I'm feeling about getting it back into the garage in a somewhat organized manner and still have room for a pretty cool jam spot makes it more than worth it.
On a side note, I'm seriously stoked about getting carpet in there. Probably gonna start cutting Rockwool triangles and getting the traps ready to go as soon as they boogie out of here. And then, I'm talking Saturday for cranking the schtuff out of my rig! Can't wait
Re: DIY build - garage studio
Posted: Sun Mar 16, 2014 6:58 pm
by clipless bumper
The carpet will make a big difference - padding under it would help even more.
Re: DIY build - garage studio
Posted: Mon Mar 17, 2014 12:51 am
by Tortuga
That's great to hear - carpet will be padded.
Re: DIY build - garage studio
Posted: Wed Mar 19, 2014 12:23 pm
by Tortuga
Got back to researching acoustic treatments last night, and started checking out diffusion panels. Seems to be some kind of mystery science, as it seems that in order to be most effective, they have to be specifically designed / tuned to a specific room & application... My OCD is going berzerk right now - why can't this be easier?
ajaxlepinski (or anyone else), is there a benefit to putting something like that together? If I give it a try, should I be looking at a 12x12, 18x18, 24x24 size or something other? Multiple or one just on the back wall (behind my head where I'd be mixing from)? I see quite a bit of DIY info for diffuser panels similar to the top one posted above, and would appreciate any advice on something like that, or these:


The second looks easiest to build, and there's a great article here:
http://tapeop.com/tutorials/83/diy-diffusors/Help me, Obi-Wan, you're my only hope

Re: DIY build - garage studio
Posted: Wed Mar 19, 2014 12:49 pm
by Tortuga
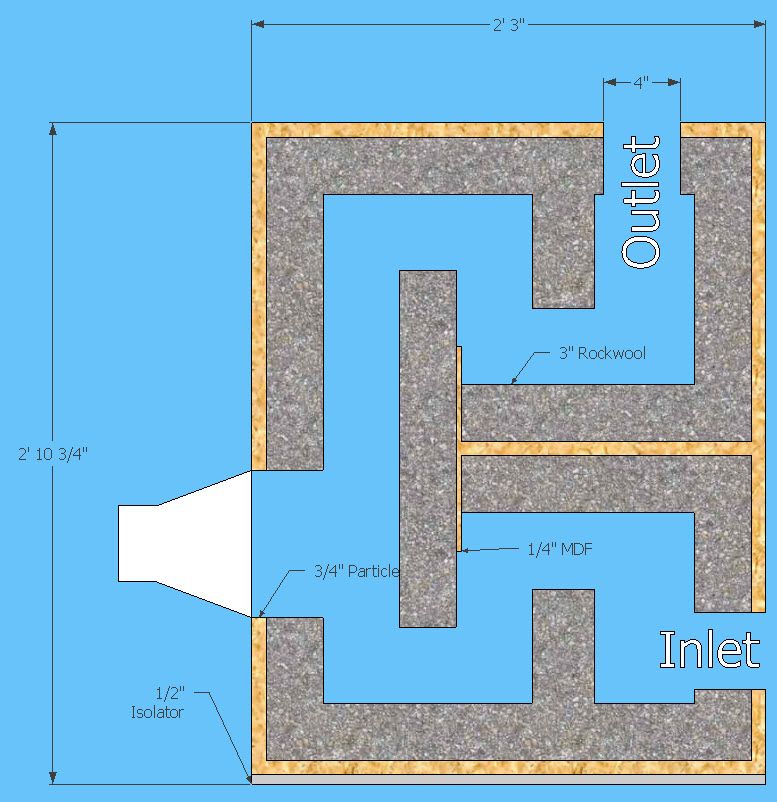
In addition to the acoustic treatment
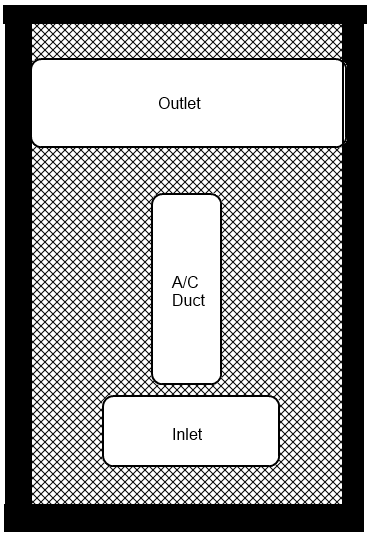
in the room, I'm also doing some design for what's needed outside the room, specifically air muffler / silencers. The problem here (as I understand it) is that ventilation must be handled by something that allows the air to flow, but kills noise as it travels through. I need two ventilation paths for my room - an exhaust for the AC unit, which generates heat that needs to be removed as it cools the inside air, and a fresh air intake, which will help keep me and anyone else from passing out from oxygen deprivation - the room is pretty near airtight, or at least it will be when I'm done sealing the door.
The particular AC unit I'm using normally requires a window to vent the hot air out. The manufacturer states that adding hoses to this exhaust can't be done, as it will cause the unit to overwork itself, so anything I do with this exhaust must allow it to flow without restriction. Since the muffler / silencer that I'll be building will cause some back pressure, I'll be adding an inline fan to help suck the exhaust through. All good, right? Well, the other concern is that we can't be pulling too much through the AC unit, so we need something to 'tune' the flow.
The design we've come up with, so far, directs the heated exhaust up through a 'maze' made of Rockwool, which will cause the sound to be absorbed as the air passes through. We also have added an air inlet, which directs incoming air (being sucked through by the fan) past the exhaust, hopefully causing a sort of vacuum, and encouraging the heated air to go towards the exhaust.
Sorry for the junior science lesson... Here's what I came up with:
A concern was raised that the air may not be 'encouraged' to rise, as there is less resistance in the air inlet path, so I proposed a few changes:
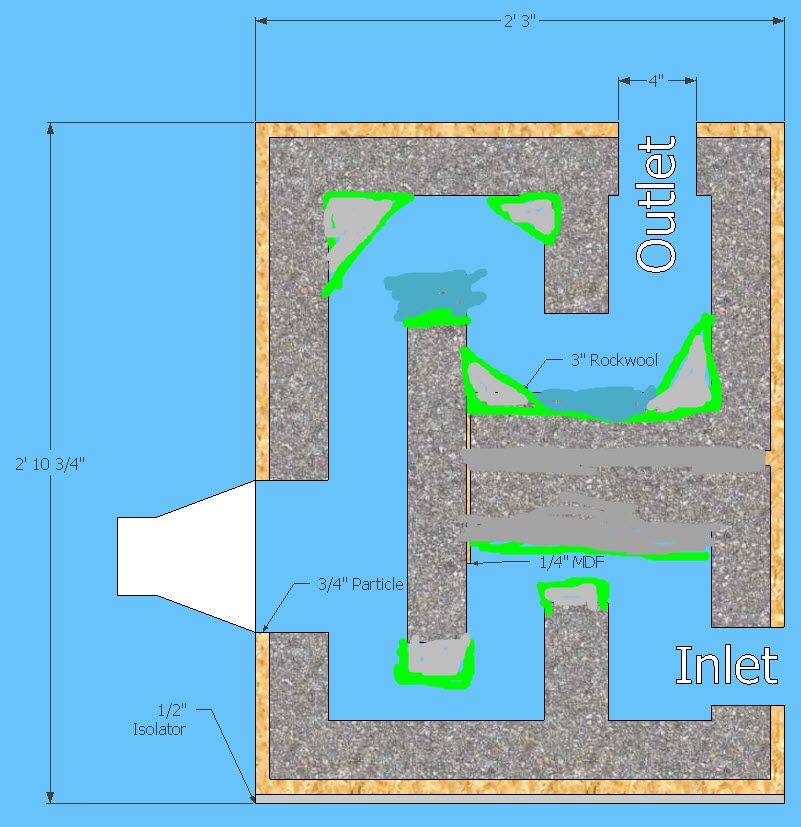
Another way to reduce flow on the intake path would be to make the side-to-side dimension smaller than the output, as shown here:
We're still discussing, and I hope to finalize and build a prototype either this weekend or over the next week.
And, any input is welcome by ya'll!


